You’re looking to start recording and want the best audio interface for your needs.
Here we our best audio interface picks and why they feature.


Famous Focusrite users: Noisia, Rob Chapman, Tyler The Creator
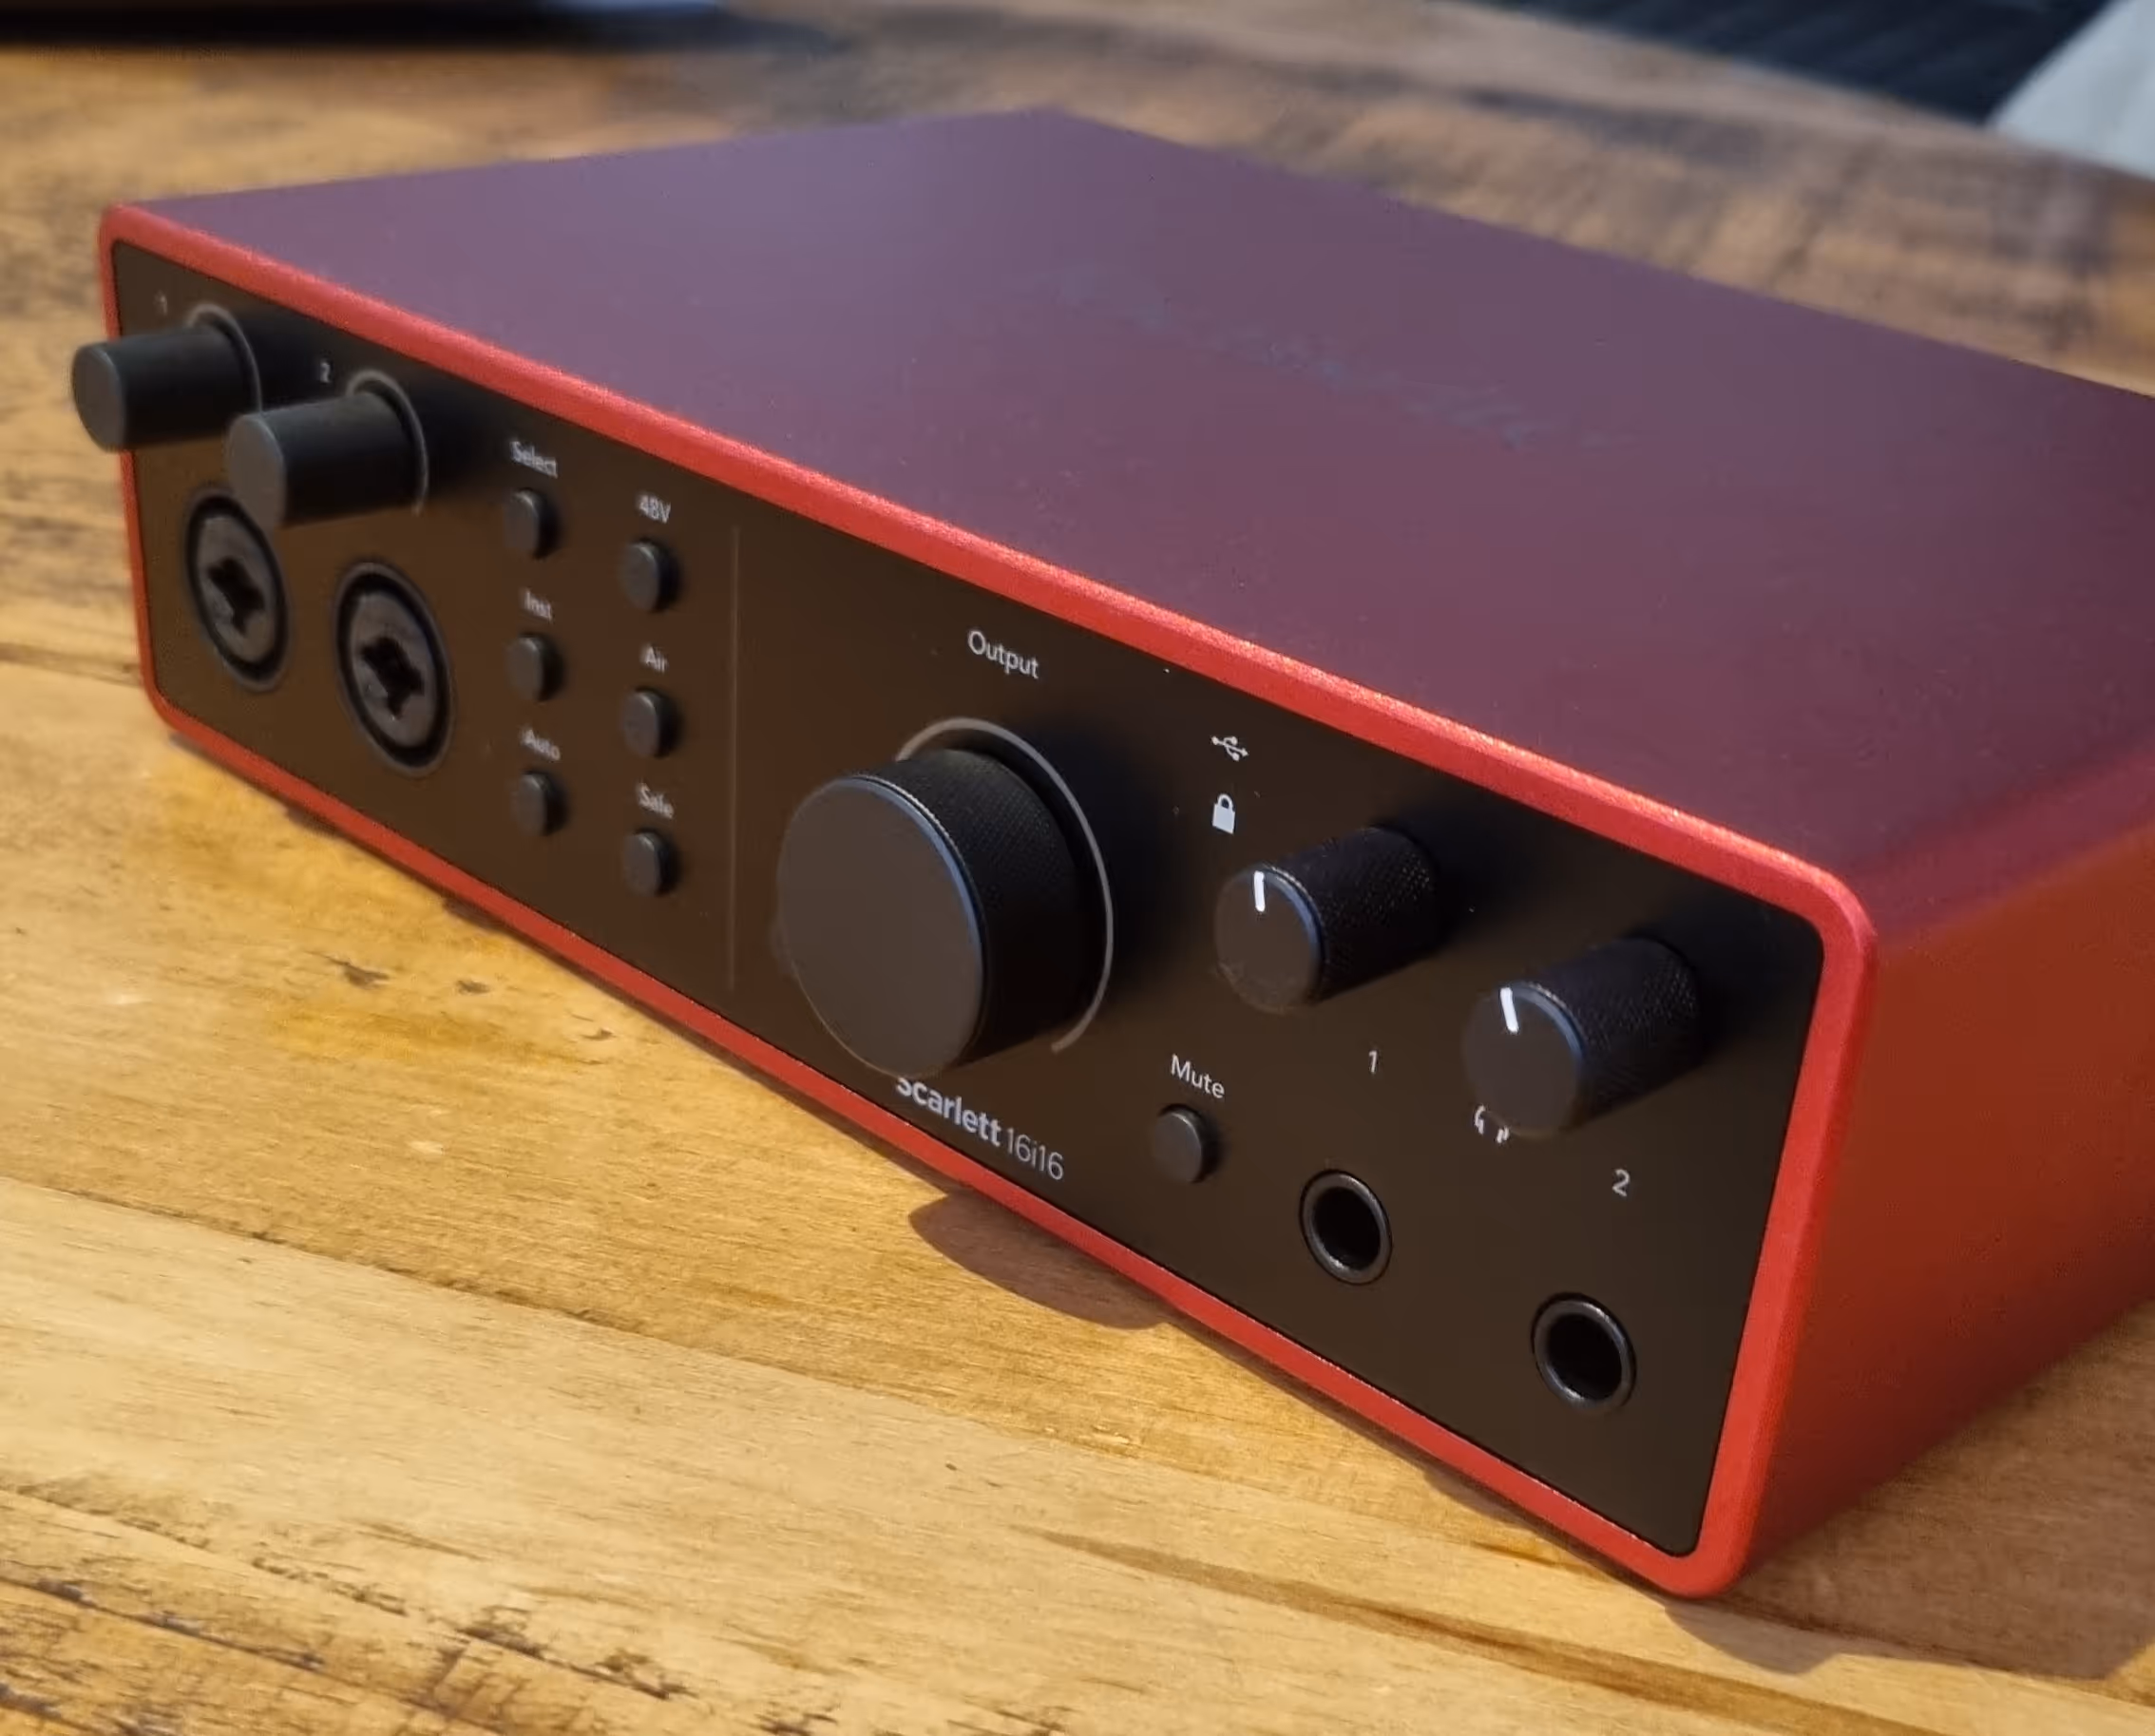
Much as the 2i2 did, it's very easy to see why the Scarlett 16i16 (4th Gen) is winning over home studio producers. The recording quality is high, due to leaning on the Focusrite RedNet-derived converters. Delivers the standard of clarity and dynamic range you’d expect in a much pricier interface.
For producers needing a more complex setup with multiple instruments, synths or outboard processors, the 16i16 stands out as the most flexible interface on this list for simultanious recording.
With a total of 16 simultaneous inputs and outputs via analogue, MIDI, ADAT, and S/PDIF connectivity options, there’s room to extend your setup even further. Whether you’re tracking drums with external preamps or running synths and hardware effects in and out, this interface won't limit your signal chain.
This interface is perfect for beginners even if they aren't ustilising all the IOs. With exceptional features like Auto Gain and Clip Safe. These 2 time savers take some of the accidental novice obstacles out of recording. The 16i16 also features a reworked Air mode, which gives vocals and acoustic instruments a bit more sparkle.

If you're looking to really use all inputs, you may be disappointed that only two signals will go through the mic preamps. So to mic a whole kit straight into the interface, you’ll need external gear.
The Scarlett 16i16 feels like a smart step up from beginner to intermediate. Its best uses are for recording multiple instruments or reamping workflows, along with thoughtful features that keeps your creativity flowing.

Famous UAD users: Rob Kinelski, Vic Wainstein, Butch Walker
The preamps on this device are impressively clean and produce minimal noise. These transparent preamps will accurately capture the nuances of your recordings without adding unwanted colour.
The interface offers a mix of XLR and 1/4-inch inputs. It doesn’t exude many options but provides enough flexibility for many recording situations. It’s a practical setup without unnecessary extras.
Thunderbolt 3 connectivity is a feature that may or may not matter, depending on your setup. It’s not universally applicable, but for those who can use it, the speed and low latency are noticeable benefits. For others, it might just be a feature on the specs list without much impact.
The design is neither flashy nor dull; it’s just practical. The desktop form is unobtrusive but functional. It doesn’t demand attention – it quietly fits into your studio without stealing the spotlight. No unnecessary aesthetics, just a focus on practicality.
In summary, the Universal Audio Apollo Twin X isn’t trying to impress with fancy features. It’s about the basics – clear audio, versatile inputs, modern connectivity, and a design that doesn’t distract. It doesn’t aim to be the centre of attention; it quietly excels at what it does.

The Behringer UMC22 stands out as the best budget audio interface on the market.
An impressive recording resolution is offered given its price point. The MIDAS technology preamp integrated into this modest package is a standout feature. It helps strengthen the audio signal, contributing to a clean and transparent sound. Great for those wanting to start recording without breaking the bank.
Having both XLR and TRS inputs is a simple advantage. This versatility allows you to connect microphones and line instruments.
The plastic build housing does feel budget. Making the UMC22 feel less robust compared to its more premium interfaces. A compromise that users should be aware of, particularly if durability is a priority.
Another point to consider is the relatively low recording headroom. This limitation means that the interface may struggle with handling louder audio sources. Which could lead to potential distortion in certain recording scenarios. It’s a trade-off for the budget-friendly nature of the UMC22. A factor to consider for those with specific recording requirements.
Despite its drawbacks, the Behringer UMC22 is a budget champion. Competent recording capabilities with the perk of MIDAS technology in its preamp. The plastic build and limited recording headroom are compromises you make for affordability. This audio interface provides a practical and functional entry point into audio recording.

Famous Presonus users: Headhunterz, Kurt Schneider, Jeff Ellis
The PreSonus AudioBox USB 96 is our pick for streaming. It’s a practical, straightforward interface which will do the job and do it well.
The audio quality is a critical aspect of any streaming setup. The AudioBox USB 96 has gained a reputation for its clean audio-producing preamps. The transparent amplification manages to capture your voice with clarity. It’s not studio-quality audio recording, but it doesn’t have to be as long as you have the best streaming microphone with it.
Its design is simple. With two combo XLR/TRS inputs, it sticks to the essentials. A straightforward approach that caters to the practical needs of content creators.
The 24-bit resolution and 96 kHz sampling rate mean the audio is excellent for streaming. Your voice will sound more than clear and articulate. It’s not outrageously good, but it’s a step up from built-in soundcards, and users seem to notice the upgrade.
The headphone output lacks a bit of power, which might be a concern if you’re using high-impedance studio headphones. Additionally, the build might not scream durability. The PreSonus AudioBox USB 96 offers a pragmatic solution that gets the job done.

It’s not the flashiest device, and it doesn’t try to be – it’s more about being practical, and podcasters seem to appreciate that.
Audio quality is crucial for podcasters, and the UA Volt 1 does well in this area. The preamp works without adding unwanted noise, giving a clear signal for your voice recordings. While it does not match the top-notch quality of expensive studio gear, its a great standard for podcasting needs.
The design is, simply put, basic. It has a single XLR/TRS combo input, suitable for solo podcasters or those doing interviews. No flashy features or unnecessary controls – just a tool to get your voice into digital. For podcasters who prefer simplicity, this aligns with practicality.
Now, the 24-bit/192kHz recording capabilities might seem like too much for regular podcasting. However, users note that the higher bit depth and sampling rate result in cleaner, more detailed audio. While some might think it’s excessive, those who care about audio quality appreciate the extra detail.
On the downside, it lacks MIDI connectivity, which might not bother most podcasters. But if you want to add music or sound effects, it’s a limitation. Also, the price might be a bit high for podcasters on a tight budget.
The UA Volt 1 for podcasting is a straightforward tool. It doesn’t try to be more than it is – a practical interface for clear audio.

In my unexciting journey through the world of audio interfaces, the Audient iD4 has crossed my path, and, well, it’s worth dissecting its merit for beginners without any exaggerated fanfare. This isn’t a device that’s going to sweep you off your feet with bells and whistles, but it does have some practical qualities.
Let’s start with audio quality, a point of concern for anyone stepping into the audio game. The iD4 is reported to deliver a clean and transparent signal, courtesy of its Class-A mic preamp. While it won’t be mistaken for a high-end studio setup, it seems to offer a reasonable compromise for beginners not yet chasing the elusive audiophile dream.
Design-wise, it’s straightforward – a single XLR/TRS combo input and a couple of basic controls. No flashy lights or an array of buttons that might overwhelm a beginner. For someone just dipping their toes into the audio interface pool, the simplicity is more of a friend than a limitation.
Now, the 24-bit/96kHz recording capabilities might sound like jargon to a beginner. Simply put, it means the iD4 can capture a detailed and accurate representation of your audio. While not a game-changer for everyone, those who appreciate a bit more detail in their recordings find this feature beneficial.
However, the absence of MIDI connectivity might irk some beginners with aspirations beyond the basics. If you’re considering delving into the world of MIDI instruments or controllers, this limitation could be a factor to weigh. Additionally, the price point might be a bit steep for those on a tight budget, especially considering there are more affordable options in the entry-level market.
To sum it up, the Audient iD4 for beginners doesn’t boast grandeur, and it doesn’t need to. It’s a tool that quietly delivers clean audio, a simple setup, and a few features that might matter more as you advance in your audio journey. As long as the lack of MIDI connectivity and the price tag align with your beginner expectations, it’s a reasonable choice to get you started.

The Focusrite Scarlett Solo (3rd Gen) has caught a rising number of guitarists’ eyes. It’s not a device that’s going to dazzle you with a myriad of features or a futuristic design – it’s more about practicality, and guitarists are gravitating towards it.
The Scarlett Solo holds its ground with its clean preamp, offering a transparent signal for your guitar. It doesn’t add unnecessary colouration, which is something guitarists often appreciate. It might not be the pinnacle of studio-grade perfection, but it seems to hit a sweet spot for those who want a reliable tool without breaking the bank.
Design-wise, it’s refreshingly straightforward – a single XLR/TRS combo input tailored for guitarists. No fuss, no complications, just what’s needed for plugging in your instrument and getting your sound into the digital realm. For guitarists who don’t want to navigate a maze of controls and inputs, this simplicity is a plus. You would use the XLR input for micing up your top-rated guitar amp which some will prefer.
Now, the 24-bit/192kHz recording capabilities might sound like overkill to some, especially for guitarists who might not be diving into complex, high-fidelity recordings. But users have noted that the higher bit depth and sampling rate contribute to a more accurate representation of the guitar’s nuances. It might not be an immediate concern for everyone, but for those who appreciate detailed recordings, it’s a subtle yet appreciated feature.
However, the lack of MIDI connectivity might be a limitation for guitarists looking to integrate MIDI instruments or controllers into their setups. It’s a notable omission, especially for those with diverse musical aspirations. Additionally, the build quality might not scream durability, but that’s often the trade-off for a more budget-friendly device.
The Focusrite Scarlett Solo (3rd Gen) for guitarists doesn’t boast and doesn’t need to. It’s a straightforward tool that offers clean audio, a simple design, and some subtle features that cater to those who want a reliable interface for their guitars. As long as the absence of MIDI connectivity and some compromises in build quality align with your needs, it’s a sensible choice for guitarists on a budget. Get to recording on a budget with our guide to the best cheap electric guitars on the market.
Do you need an audio interface?
Before diving into the world of audio interfaces, it’s important to understand if you need one. If you’re a beginner and only recording with a single microphone, you might be able to get by without an audio interface. However, as you add more microphones or instruments to your setup, an audio interface becomes essential. It allows you to connect multiple devices and provides better control over your recordings.
When considering whether you need an audio interface, it’s important to think about the quality of your recordings. While you can certainly record using the built-in audio inputs on your computer, these inputs are often not optimized for recording audio. They can introduce noise, and distortion, and have limited dynamic range. An audio interface, on the other hand, is designed specifically for recording audio and will provide cleaner, higher-quality recordings.
Another factor to consider is the flexibility an audio interface offers. With an audio interface, you can easily connect multiple microphones or instruments to your computer. This is especially important if you plan on recording a band or multiple musicians simultaneously. An audio interface will have multiple inputs, allowing you to capture each source individually and mix them later in your recording software.
Furthermore, an audio interface provides better control over your recordings. Most audio interfaces come with built-in preamps, which amplify the signal from your microphones or instruments. These preamps are often of higher quality than the ones found in consumer-grade computers, resulting in a cleaner and more accurate representation of your sound source.
Additionally, audio interfaces offer features such as phantom power, which is necessary for powering condenser microphones, and direct monitoring, which allows you to hear yourself in real time without any latency. These features can greatly enhance your recording experience and make the audio interface a valuable tool in your setup.
It’s also worth mentioning that audio interfaces come in a variety of sizes and configurations, ranging from compact units with a few inputs and outputs to larger, rack-mounted interfaces with extensive connectivity options. This allows you to choose an audio interface that best suits your specific needs and budget.
In conclusion, while it’s possible to record without an audio interface, as you progress in your recording journey and expand your setup, an audio interface becomes an essential tool. It provides better recording quality, flexibility, and control over your recordings. Whether you’re a beginner or an experienced musician, investing in an audio interface can greatly enhance your recording capabilities and help you achieve professional-sounding results.
How many inputs and outputs do I need?
The number of inputs and outputs you need depends on your specific requirements. If you’re a solo artist who primarily records vocals or a single instrument, a two-input audio interface should suffice.
However, if you plan on recording a full band or need to connect multiple microphones and instruments simultaneously, you’ll need an audio interface with more inputs and outputs.
When recording a full band, it’s important to consider the number of individual instruments and microphones that will be used. Each instrument and microphone will require its own input, so having enough inputs on your audio interface is crucial.
For example, if you have a drum kit with multiple microphones for each drum and cymbal, you’ll need enough inputs to accommodate all of them. Additionally, if you have multiple guitars, keyboards, or other instruments that you want to record simultaneously, each instrument will require its own input as well.
Having more inputs allows you to capture each instrument and microphone separately, giving you more control during the mixing and editing process. It also allows for more flexibility when recording, as you can easily adjust the levels and settings for each individual input.
On the output side, the number of outputs you need depends on your desired monitoring setup. If you’re just starting out and plan on using headphones for monitoring, a two-output audio interface will be sufficient. However, if you want to connect multiple sets of speakers or have a more advanced monitoring system, you’ll need an audio interface with more outputs.
Having more outputs allows you to connect to different sets of speakers or headphones simultaneously, making it easier to switch between different monitoring options. It also allows for more flexibility when mixing, as you can send different audio signals to different outputs for more precise monitoring.
Ultimately, the number of inputs and outputs you need will depend on your specific recording setup and requirements. It’s important to assess your needs and consider any future expansion plans before choosing an audio interface.
What types of inputs and outputs do I need?
When choosing an audio interface, it is important to carefully consider the types of inputs and outputs that you require. This will ensure that you have the necessary connections to accommodate your specific needs and preferences. Let’s dive deeper into the various types of inputs and outputs commonly found in audio interfaces.
XLR Inputs
XLR inputs are an essential feature to look for in an audio interface if you plan on connecting microphones. XLR connectors are widely used in professional audio applications due to their balanced design, which helps minimize noise and interference. These inputs are commonly found on audio interfaces designed for recording vocals, acoustic instruments, or any other sound source that requires a microphone.
TRS Inputs
TRS (Tip-Ring-Sleeve) inputs are another type of input that you may need, especially if you plan on connecting instruments or line-level signals. These inputs are typically used for connecting guitars, keyboards, synthesizers, and other electronic musical instruments. TRS inputs can handle both balanced and unbalanced signals, making them versatile for a wide range of audio sources.
MIDI Inputs and Outputs
If you work with MIDI keyboards or synthesizers, it is crucial to ensure that the audio interface you choose has MIDI inputs and outputs. MIDI (Musical Instrument Digital Interface) is a protocol that allows electronic musical instruments, computers, and other devices to communicate and synchronize with each other. MIDI inputs and outputs on an audio interface enable you to connect MIDI devices and control them directly from your computer or recording software.
Having MIDI connectivity can open up a world of possibilities for music production, allowing you to integrate hardware synthesizers, drum machines, and other MIDI-compatible devices seamlessly into your workflow.
When considering the types of inputs and outputs you need, it is also important to think about the number of each that you require. Depending on your recording setup and the number of instruments or microphones you plan to connect, you may need multiple XLR inputs, TRS inputs, or MIDI ports. Some audio interfaces offer a combination of these inputs and outputs, while others provide expandability options through additional input/output ports or digital connectivity.
Ultimately, the types of inputs and outputs you need in an audio interface will depend on your specific requirements and the type of audio production you engage in. Taking the time to evaluate your needs and understanding the various options available will help you make an informed decision and ensure that your audio interface meets your expectations.
How do I connect my audio interface?
Connecting an audio interface is a relatively straightforward process. Most audio interfaces connect to your music production laptop via USB or Thunderbolt. Ensure you have the necessary cables and drivers for your specific interface. Once connected, you can configure your audio settings in your recording software to recognize the audio interface as the input and output device.
What is low latency recording?
Low latency recording is crucial for real-time monitoring and recording without any noticeable delay. Audio interfaces with higher sample rates and lower buffer sizes offer lower latency. This is particularly important for musicians who need to hear themselves in real-time while recording, as any delay can be distracting and affect their performance.
Can I make music without an audio interface?
While it’s possible to create music without an audio interface, having one greatly expands your possibilities. An audio interface provides better sound quality, flexibility, and control over your recordings. It also allows you to connect professional microphones and instruments, resulting in a more professional-sounding final product.
What else do I need to start recording?
Alongside an audio interface, you’ll need a few other essentials to start recording. A good microphone, headphones, and cables are essential for capturing and monitoring audio. Additionally, having recording software and a computer or mobile device capable of handling the software is necessary. With these tools in place, you’ll be well on your way to creating high-quality recordings.
Investing in a good audio interface is worthwhile if you want to explore recording audio. It allows you to achieve professional-quality recordings and provides the necessary tools for connecting multiple devices. Consider your specific needs, such as the number and types of inputs and outputs required, when choosing an audio interface. Remember to also prioritize low latency recording for a seamless recording experience. With an audio interface and the right setup, you’ll be able to get your recordings to a more than satisfactory level.