Your mix sounds clean, every element sits in its proper place, and technically everything is correct. But something feels missing. The track sounds sterile, almost lifeless - like it was made by robots instead of humans.
If this frustrates you, you're not alone.
Saturation is the secret ingredient that transforms amateur mixes into professional productions.

- Saturation adds warmth and character by creating musical harmonics that make your mix sound fuller and more exciting
- The three main types (tube, tape, and transistor) each bring unique flavors - tube for warmth, tape for glue, transistor for edge
- Start with subtle amounts (barely audible) and apply strategically to key elements rather than every track
- Always level-match when comparing to avoid the "louder sounds better" trap that ruins many mixes
As a producer whose beat was featured in a song at the Memphis Hip-Hop Awards, I understand what separates amateur mixes from professional ones. Often, the difference comes down to understanding saturation.
This guide won't drown you in technical theory - instead, I'll give you practical, step-by-step recipes you can use on your drums, bass, and vocals today.
What is audio saturation?
Think of saturation like adding seasoning to a meal. A raw vocal is the plain chicken breast - it has all the nutrition but lacks excitement. Saturation is the salt, pepper, and herbs that enhance the natural flavor without changing what it fundamentally is. You're not turning chicken into beef; you're making the chicken taste like the best version of itself.
Saturation is a subtle form of distortion that adds pleasant-sounding harmonics. Audio saturation is a type of distortion that historically comes from overloading the physical components of analog gear.
When engineers in the past pushed signals through tape machines, tube amps, or transistor circuits too hard, something magical happened. Instead of ruining the sound, these devices added musically pleasing harmonics - extra frequencies that weren't in the original signal.
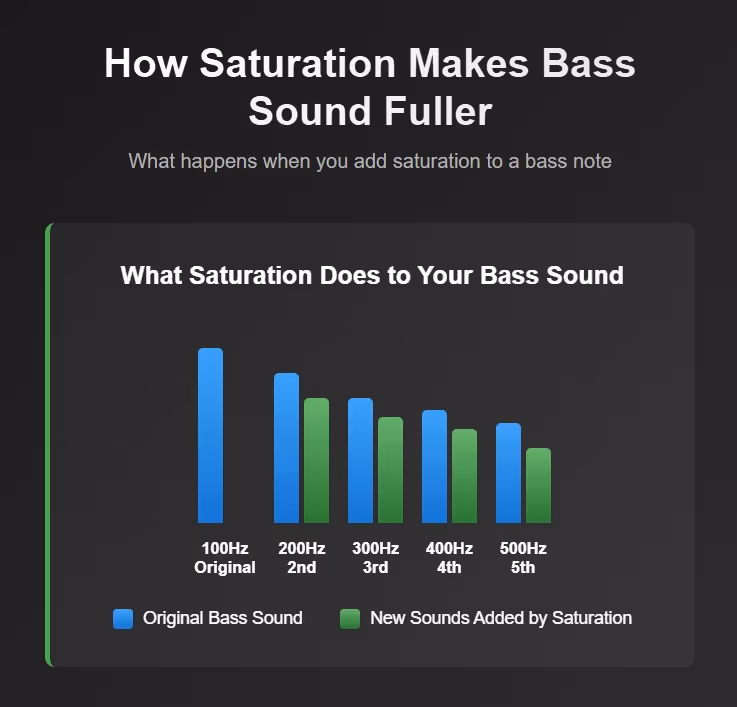
Here's what happens technically: saturation adds harmonics (overtones) to your sound. If you have a bass note at 100 Hz, saturation might add harmonics at 200 Hz, 300 Hz, and beyond. These new frequencies make the sound richer and more complex, which our ears perceive as warmer and more professional.
The beauty is that saturation also applies gentle compression, smoothing out peaks while maintaining the musical character of your source material. It's this combination of harmonic enhancement and subtle dynamic control that makes saturation so powerful.
Saturation vs. distortion
This distinction confuses many producers, so let me clear it up with a simple analogy. Saturation is like a warm oven that gently toasts your sound, bringing out its best qualities without fundamentally changing it. Distortion is a technique that intentionally burns and mangles the sound to achieve an aggressive, dramatic effect.
Distortion is a big part of saturation. When a signal becomes saturated enough, through the same process described above, it not only compresses but distorts. The key difference lies in the intent and intensity:
- Saturation: Subtle enhancement, maintains the original character, adds warmth and fullness
- Distortion: Dramatic alteration, changes the fundamental tone, adds aggression and grit
In mixing terms, you use saturation to enhance what's already there. You use distortion when you want to completely transform the sound.
A vocal with saturation sounds like a better version of the same vocal. A vocal with heavy distortion sounds like it's coming through a broken telephone or megaphone.
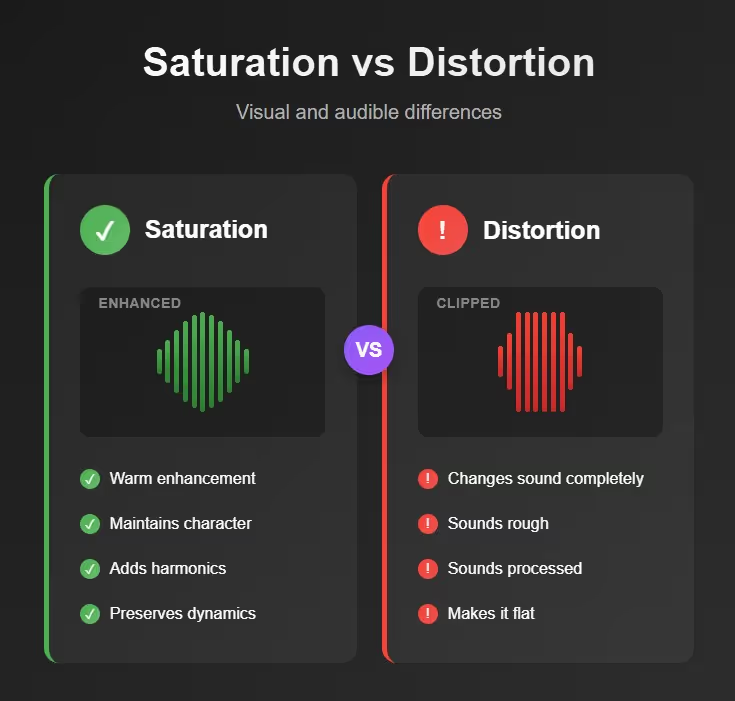
As noted in Sound on Sound's technical analysis, the distinction often comes down to the amount and type of harmonics generated - saturation stays musical while distortion becomes obviously altered.
What are the main types of saturation?
Each type of saturation brings its own character to your mix. Understanding these differences helps you choose the right tool for each situation.
Tube saturation
Tube saturation comes from the warm, rich sound of vacuum tubes found in vintage amplifiers and preamps. Tubes tend to generate more second-order harmonics, producing a warm, rich tone. These even-order harmonics create a doubling effect that makes sounds feel bigger and more present.
When you drive a signal through tube saturation, you get:
- Warmth and richness in the midrange
- A smooth, musical compression
- Enhanced presence without harshness
- Perfect for vocals, pianos, and anything needing warmth
The sound is often described as "expensive" or "vintage" because it mimics the character of classic recording equipment from the 1950s and 60s.
Tape saturation
Tape saturation recreates the sound of recording to analog tape machines. Tape saturation plugins emulate the sound of audio recorded through tape machines. They introduce odd order harmonics, subtle compression, and non-linear shifts in frequency response.
What makes tape saturation special:
- Creates "glue" that helps elements blend together
- Rolls off harsh high frequencies naturally
- Adds punch and weight to drums
- Provides both even and odd harmonics for a balanced tone
Many engineers swear by tape saturation on mix buses because it makes everything sound more cohesive, like all the elements were recorded in the same room.
Transistor saturation
Transistor saturation emulates solid-state circuitry found in modern hardware. This type has a different character from tubes and tape - it's more aggressive and edgy.
Transistor saturation characteristics:
- Adds primarily odd-order harmonics
- Creates a "fuzzy" or "gritty" texture
- Helps sounds cut through dense mixes
- Great for electric guitars, synths, and aggressive vocals
While tube saturation makes things warm and smooth, transistor saturation adds bite and attitude. It's perfect when you need something to stand out rather than blend in.

How to mix with saturation
These aren't vague suggestions; they're specific recipes you can apply immediately.
Start small
The biggest mistake beginners make is adding too much saturation. Here's the foolproof method:
- Add your saturation plugin to the track
- Turn the drive/amount knob to zero
- Slowly increase it while listening carefully
- When you first notice the effect, back it off by 10-20%
- Toggle the plugin on/off to confirm it's improving the sound
Remember: if saturation is obvious, you've probably used too much.
Make punchy drums
Want your drums to hit harder while sounding more cohesive? Here's the exact process:
- Insert a tape saturation plugin on your drum bus (not individual drums)
- Set the drive to a low setting (around 20-30% to start)
- Adjust the plugin's output to match the input level
- Listen for how the kick and snare start to "glue" together
- You should feel the drums pushing forward in the mix without getting louder
The tape saturation adds subtle compression that tames transients while the harmonics fill out the body of each hit. Your drums will sound like a cohesive kit rather than separate samples.
Adds presence to bass for all speakers
This is crucial for modern production - your bass needs to translate on phones and laptops, not just studio monitors.
- Add tube or transistor saturation to your 808 or bass track
- Start with moderate drive (30-40%)
- Focus on the 800-2000 Hz range where the harmonics appear
- These new mid-range harmonics make the bass audible on small speakers
- Blend to taste - usually 30-50% wet signal is plenty
The added harmonics act like a "presence beacon" that lets listeners hear the bass melody even on terrible speakers. This is why professionally mixed tracks still bump on phone speakers.
Helps make vocals warm
Saturation can transform a thin, digital vocal into something that sounds expensive and professional.
- Insert subtle tube saturation on your lead vocal
- Keep the drive very low (10-20% maximum)
- Focus on the warmth added to the 200-500 Hz range
- The vocal should feel "bigger" without getting louder
- Use more aggressive settings only for special effects or ad-libs
The tube saturation adds body and presence that helps the vocal sit perfectly in the mix. It's like the difference between a $50 microphone and a $5,000 one.
3 Common saturation mistakes beginners make
Even with the best intentions, these mistakes can ruin your mix. Here's how to avoid them.
#1: Using it on every single track
When everything is saturated, nothing stands out. Your mix becomes a muddy, indistinct mess where all elements blend into sonic soup.
The Fix: Apply saturation strategically. Focus on:
- Drum bus (not every drum)
- Bass (for translation)
- Lead vocal (for presence)
- Mix bus (very subtle for glue)
Leave some elements completely clean to maintain contrast and clarity.
#2: Forgetting to level-match
Saturation often increases perceived volume, tricking your brain into thinking it sounds better simply because it's louder. This is the "louder is better" trap that ruins countless mixes.
The Fix:
- Note your track's level before adding saturation
- After applying saturation, adjust the plugin's output
- The level should match exactly when bypassing the plugin
- Now you can honestly evaluate if the saturation improves the sound
Professional mix engineers as noted by iZotope, always level-match to make accurate judgments about whether processing actually improves the sound.
#3: Adding presets blindly
That "Vintage Warmth" preset might sound great on the demo track, but your vocal is completely different. Presets are starting points, not final destinations.
The Fix:
- Start with the plugin at neutral settings
- Make adjustments based on YOUR source material
- Use presets only to learn how the plugin works
- Save your own presets once you find settings that work
Every source is different. A preset that works on a jazz vocal will destroy a rap vocal. Trust your ears, not the preset names.
Round-up
Saturation is one of the most powerful tools for bridging the gap between an amateur and professional-sounding mix. It's the warmth you feel in vintage recordings, the punch in modern hip-hop drums, and the presence that makes vocals command attention.
Now that you understand the what, why, and how, you have the knowledge to start using saturation with confidence. Remember to start subtle, choose the right type for each source, and always level-match your comparisons.
With these techniques, you can add that final 10% of analog warmth and character that transforms good mixes into great ones.
Can I use saturation on my master bus?
Yes, but be extremely subtle. Many mastering engineers use high-end tape or tube saturation to add a final layer of "glue" and warmth to a mix.
If you do it yourself, aim for just 1-2% of drive and use a high-quality plugin. The goal is enhancement that you feel more than hear.
What's the best free saturation plugin to start with?
Several great free options exist. Softube's "Saturation Knob" is a fantastic and simple one-knob tool that's perfect for beginners.
Klanghelm's IVGI offers more control with excellent tube emulation, while CHOW Tape Model provides authentic tape saturation. All three can deliver professional results without spending a penny.
Does saturation replace the need for EQ and compression?
No, it's a complementary tool. Saturation adds harmonics and gentle compression, but it doesn't replace the surgical precision of an EQ or the dynamic control of a dedicated compressor.
Think of saturation as the seasoning, while EQ and compression are your main cooking techniques - you need all three for a complete mix.
Should I use saturation during recording or mixing?
Both have their place. Recording through hardware saturation (or quality plugins) can add character that becomes part of the performance.
However, most modern producers add saturation during mixing for more control. If you're unsure, record clean and add saturation later - you can always add it, but you can't remove it once it's printed.
How do I know if I've added too much saturation?
Listen for these warning signs:
- The mix sounds muddy or congested
- Individual elements lose their definition
- Everything sounds "fuzzy" or unclear
- You hear obvious distortion artifacts
A properly saturated mix should sound fuller and more exciting while maintaining clarity. When in doubt, dial it back and compare with commercial references in your genre.