Vocal mixing is the production step where you polish and perfect how your vocals sit in the mix.
How do you know how loud the vocal track should be compared to the other tracks? How do you make sure that your vocalist along with other instruments come through clearly? Most importantly, how do you make sure the vocals don’t get lost within the mix?
We’ll break down in detail each step that can make a massive difference to your vocal mixing process.

#1. Record a quality vocal
The first step to mixing vocals is to make sure they are recorded to the best of your abilities in the first place. The old adage “you can’t polish a t… piece of dirt” rings true in this context. No matter how much time you spend improving on that piece of dirt, through different presentation options or external complementary arrangements, it will still always be a piece of dirt at its core.
Having said that, it is possible that sure that someone is rigorously testing this theory at an incredibly modern art exhibition somewhere in the world. Probably. The different factors that go into the quality of your vocal recording are as follows.

- Microphone selection
- Mic placement in relation to the room
- Mic position in relation to the vocalist
- Room acoustics treatment
We cover specific vocal recording tips details in a different article. For now, let’s move on to vocal mixing steps once your recording is complete.
#2. Edit and compile your vocal takes
The second set of tasks you should undertake before mixing vocals consists of making sure the raw recorded audio track you are working with is the best it can be. This entails going through the audio with a detailed ear listening out for any errors or mistakes within the vocal performance and being aware of any unwanted clicks and pops throughout the recording take.
During the tracking stage, as you move already be doing, it is always best practice to record several takes of each verse, chorus, or the entire song. You can then compile the best of each take into a final version vocal track with no performance errors along with your preferred phrasing. This is known as ‘comps’ or ‘compiling’ which essentially describes the process of piecing together a perfect compilation of the best vocal takes.
Gaps and silences can be introduced at the beginning and end of your vocal phrases to make them sound clean. This can be done by selecting a specific section within the waveform and then using your cutting or copying curser tools to create space on either side of the vocal phrase. This is a neat little trick for reducing any humming or other low rumbling unwanted sounds that may appear throughout your recording. These can simply be deleted in-between vocal phrases.

Silencing or reducing breaths in your performance is another way that editing can contribute to achieving a nice clean natural-sounding vocal.
It is important to make sure that your final vocal track is a truly perfect performance before moving onto plugins and sound manipulation during the rest of our vocal mixing process.
#3. Tune your vocals accurately
Once you have edited and compiled a flawless vocal performance, the next step is to go through and make sure that the vocal pitch is accurate throughout the track, according to your ears at least.
Manual vs automatic tuning plugins
Manual pitching capabilities in these plugins, rather than automatic settings, are preferred by mix engineers due to the control and flexibility one can have over how much or how quickly the pitch correction changes.
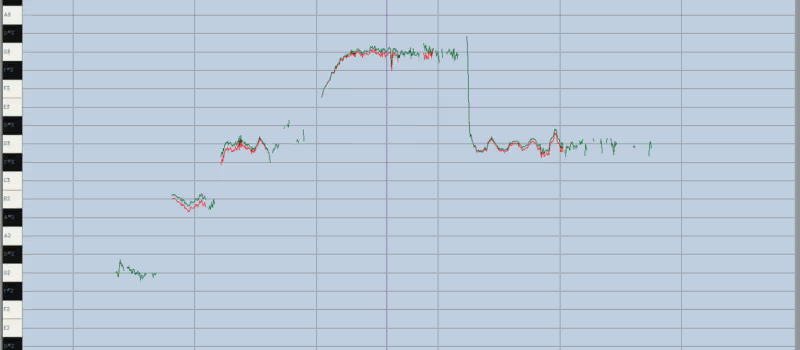
In the below example, the vocal was sung a little flat in parts, you can see how the individual lines are moved and raised in this instance to hit the note. The red lines represent where the vocal note originally was sung if moved by the engineer.
On occasion with automatic plugin settings, the pitch correction processing can kick in too quickly which can lead to a slightly robotic or unnatural sounding voice.
You may have most likely unknowingly heard automatic plugin tuning settings as a more deliberate technique with genres such as hip-hop RnB, or pop. Cher is the famous original prankster of this effect in her song ‘Believe’ where the attack of pitch correction is exaggeratingly aggressive and produces that famous almost robotic vocal sound.

When the vocal tuning task is executed manually, even though it may take more time, the pitch processing will sound more natural, subtle, and smooth.
Leaving some pitches or vocal slides un-tuned or imperfect is also a creative choice that could be made by the artist or mix engineer. This could further convey an emotion or unique energy in the context of the phrase that’s being sung and received by the listener. Vocals are a form of communication at the end of the day in which imperfections can sometimes be perceived as perfect.
For those who want the specifics of using a pitch-tuning plugin, we recommend checking out our article on how to use Autotune. This goes into detail about how to produce great-sounding vocals using plugins such as Autotune or Melodyne.
#4. Set up and prepare your DAW chain for mixing vocals
Setting up your DAW for vocal mixes can be incredibly time-consuming and fiddly. You will need to include essential components such as mix buses, compressors, EQs, and other plugins. The specific way you set up your DAW for mixing vocals is called a vocal chain.
Our newly released vocal chain preset download can save you this time as well as giving you high-quality sounding vocal mix presets to use straight away for most genres. Simply download and import straight into your session. Our mix engineers have put presets together which are perfectly adjusted to a variety of genres. This can also be used as a starting point for you to play around with until you find the sound that sits best in your track.

Mix using our vocal chain presets
#5. Automate your gain to steady the signal
For those of you who would like a bit more of an explanation of automation in mixing; for those comfortable with the concept, read on.
Gain automation or “gain staging” is used when mixing vocals to level out the softness or loudness of the vocalist.
This ensures a steady signal is present throughout your vocal audio.

Think of it almost as a manual compression by lowering high peaks, simply using automation. It is important to do this before using any plugins are used to create a richness of signal that will help the plugins primary effect and amplify the impact.
There are 2 core ways to implement volume or gain automation:
- Manual implementation
- Fader riding
Manual implementation as the name suggests is automation implemented into the DAW manually through mouse clicks and some neat and tidy keyboard shortcuts. The benefits of this are that you can be rigorously accurate with your automation timing with easy to use pinpoint grid snaps within your DAW display.

Fader riding implementation is an analogue art of moving the faders manually to record the automation live as you listen through the playback of the song. It’s considered a performance, given that it relies on human decision-making based on the responsiveness of a personal feeling throughout the recording. When consistently practised, this can be a much quicker way of implementing your automation but does require some extra gear in the form such as a physical mixer unit with multiple channel faders. You might not even need an audio mixer unit; a lot of the best audio interfaces now have knobs and dials that are DAW-compatible for automation.
The objective of gain automation is to control the dynamic level of the vocal whether the singer is whispering or shouting and ensure its consistency throughout the performance, phrase to phrase.
Gain automation and volume automation are slightly different, read on to find out where our volume automation recommendation is within the vocal mixing process.
#6. Shape the tone of your vocal with EQ (equalization)
EQ or equalization is the action of shaping or manipulating the frequency output of your instrument or sound.
There are 2 types of EQ actions you can take and whilst they have different names around the industry, here we will call them subtractive and additive. We would recommend that each type of EQ has its own plugin unit so having both would consist of 1X subtractive and 1X additive EQ plugins loaded on your vocal channel strip.
Subtractive EQ
Subtractive EQ describes how you cut or remove certain frequencies that seem to sound unpleasant or negative due to a variable within the vocal audio recording. This could be an acoustics flaw within the room used for recording or perhaps there is an unwanted frequency that is coming through too prominently from the vocalist’s voice.
You can find the unwanted frequency initially by boosting a narrow bandwidth bell and moving it up and down the hertz scale. You can determine the note of the unwanted resonating frequency by using a musical note-to-frequency chart. This can be valuable to see if it is present across your other instrument recordings, as it may have been caused by specific notes that are reacting with the room’s acoustics. Look into improving your studio’s acoustics here.
It’s crucial to keep your subtractive bandwidth narrow so that other frequencies aren’t cut in collateral damage.

A big part of subtractive EQ is using high-pass and low-pass filters.
A high-pass filter removes all the frequencies below a certain point, whereas a low-pass filter does the opposite – removing everything above a specified cutoff point. These filters are incredibly useful for removing massive ranges of unwanted clutter frequencies like low muddy rumbling noises or high hissing sounds. Getting this right can create a nice amount of space within the frequency spectrum for your other instruments to thrive within the mix.
Additive EQ
Additive EQ describes the action of boosting or emphasizing a frequency to shape towards a desired tone. This is how you can create a vocal sound that stands out in the mix and sounds clearer.
Be wary about boosting a frequency too much as this can cause channel distortion depending on the gain level across your vocal chain.

Both subtractive and additive EQ are a must for mixing vocals and for the track to work cohesively. These techniques should be applied across all your sounds and instruments as a collaboration, though vocals are a great place to start.
#7. Use compression and parallel compression to keep things consistent
Compression helps create an even sound if the vocal mix level is too dynamic with loud peaks and soft pits, which could be inconsistent to mix with and, eventually, uncomfortable to listen to.

Compression plugins control how much of the sound is amplified and how hard it will be pushed with a certain threshold. Hard compression can cause the vocals to become muffled, so play around with your threshold level and listen out for how it fits creatively within your track.
You can adjust how much of the signal gets compressed with how fast an attack time (how soon after initial input) and how slow a release time (when volume returns).
Parallel compression
Parallel compression is the technique of duplicating a vocal signal and applying heavy compression whilst placing it at a very low level in the mix.
The idea behind this technique is to help vocal clarify in your mix by adding thickness or fullness without increasing the volume compared to the other instruments in the track. With parallel compression you are able to control how much difference there is between both signals before they head off into different speakers – this can be helpful if one phrase needs more punch while another may not.
There are a few ways you can work to implement parallel compression, the most common being by duplicating your vocal track, applying compression there, and controlling the volume of the duplicate track. Another way is to send your signal through an aux and apply the compression in the same way.

It’s important to keep the parallel track or send at a low level.
The aim here is only to support the main vocal track, rather than be its own sound within the mix.
You can also play with achieving further sounds by adding EQ settings to your parallel vocal chain.
Once all the peaks are smoothed over and your vocal is clear, there are other compression techniques that can be used to really push the vocal sound within your mix.
Additional hard compression
This type of compressor can be added within your vocal chain to really flatten and thicken out the upfront sound of your vocal. This may not be appropriate for some genres where the preference is to keep the natural transients of the voice throughout the song.
This technique is used a lot to great effect in pop records where the voice is needing to fight for attention in everyday public environments.
Side-chain compression
The objective of this technique is to essentially use another instrument or sound within your mix to influence the amount of compression applied to the vocal. The activity of the chosen side chain sound will then dictate when compression’s effect is applied to the vocal. The best example of this technique demonstrated is in electronic music, where the kick is chosen frequently as a side chain to the vocal compression.
Sidechaining can be used in an amazing amount of creative purposes that apply to all your instruments, not only vocals. Read our article here which goes into some more detail.
#8. Use a de-esser to smooth over sharp syllables (sibilance)
A de-esser is a tool to help you reduce the sharp phonetic sounds, called sibilance, from the vocalist that seem to stick out and be disruptive to the listening experience. Examples of sibilance can sound like a “sss” or “fff” type hissing noises when they’re loud, and a de-esser plugin will help eliminate these unwanted frequencies, so your vocal track stays smooth.
Simply find the sibilance frequency that’s causing the issue through your de-esser plugin, set the threshold or sensitivity and then play with the strength. The ideal result is that the sharp disruptions are reduced.

Be wary that if the threshold or strength settings are too aggressive, you will hear over compressed, crushed syllables that sound unnatural and almost equally unpleasant.
This stage of vocal mixing might not always be necessary, it completely depends on the singer’s pronunciation and specific sibilance that may get or may not get picked up through during the tracking process. The type of microphone that is being used for recording will also produce difference sibilance results which may need the de-esser stage of the vocal mix.
#9. Create vocal room ambiance with reverb and delay
Reverb can be utilized to give your vocal a sense of space within the mix. The amount added, referred to as wet or dry, will depend on how much room depth you want them to have, how loud they are in the track, and how dense the sound is. The idea is to create an “illusion” effect which mimics listening to vocals coming from different distances or locations like halls or arenas.
The reverb stage is where you can really create a sense of depth within the mix depending on how you set up your plugin. Our article on the different types of reverbs investigates specific effects and spaces you can achieve, you can calculate reverb decay times.

Delays are manipulated echoes that can achieve an insane variety of results. The length of a delay is how long you want the echo effect to go on. For vocals, we would suggest not going over 500ms or 600ms with this because it can become too distracting and muddy the mix in some cases.
You can make a variety of adjustments like setting an offset which changes how far along the delayed signal will be when heard in relation to how close together signals are being played back.

Set up your delays and reverbs on aux sends
Delays and reverbs should be setup on sends rather applied directly on the vocal channel strip. This is so you can have complete control with infusing the vocal with as much or as little of the effect as desired. In other words, as aggressive or as subtle you wish the effect to be present on the vocal.
You can also add EQ and compression to your delays and reverb sends to also refine the space effect that is being created. EQ’ing your reverb and delays is also a good way to keep the vocal remnants created by the effect clean, as to not leave any mess across the frequency spectrum space which is being used by your other instruments.
Auxiliaries are the place to get creative with your sounds. Try different combinations of modulating effects like phasers and choruses to manipulate your reverbs and really stretch the sound possibilities.
#10. Add volume automation for expression
Volume automation can be utilized for mixing vocals to musically manipulate the expression of meaningful lyrical content in the track. Certain phrases or words can really standout by simply being louder or softer than surrounding syllables. This additional detail can be easily achieved with volume automation.

A nice benefit to volume automation as a tool is that it can give vocalists peace of mind when they take breaths without worrying about messing up their continuity of delivery within one passage of lyrics. It can allow them to maintain an energy through difficult passages while supporting more dynamic musical sections by decreasing levels on less energetic parts as opposed to having a drop out where there would normally be continuous singing from beginning to end.
#11. Using harmonic saturation or distortion (optional)
You can give your vocals a creative or unique sound by adding harmonic distortion, which purposefully overloads or saturates an input of audio. It’s important to not go too far with this as it can quickly over distort and ruin any semblance of vocal clarity in your mix.

Adding this as a send aux within your mix session and gradually infusing your vocal channel is a good way to explore and decide on the right amount of distortion.
How loud should the vocals be within the mix?
The correct vocal level within the mix can vary depending on the genre and how the respective instruments to be represented in the mix based on the traditions of that genre.
Pop music vocals should be the loudest element in the mix by far. This is because the aim of pop music is have lyrics that catch quickly. To give the lyrics the chance they need to be catchy, they should be upfront and loud in the mix.
Hip-hop vocals should be very upfront but not quite as much as pop music. Key attributes here are the mid range vocal presence within the mix. Parallel compression is also particularly vital to ensure each word is heard.
Rock band vocals can sit a bit within the mix as other important instruments share the stage.
Jazz vocals are a delicate thing. The dynamics and natural transients are so important as it is all about the live, unprocessed feel of the music.
To summarize, the vocal level is usually determined by how important the lyrics of the vocal are within your mix, how many layers you have on top of them and how much mix processing has been added.
What are the best monitors for testing your vocal mix?
Each engineer or artist will have their favourite monitors for listening back, there are several downfalls with even the best studio monitors. Each set has its frequency response and can be in line with the engineer’s genre or not. There is also the acoustics of the room to juggle with. For example, some speakers are warmer whilst others can be brighter.
This can be great as a listening experience to your favorite music as a pleasant way to spend time but they won’t work effectively as a judge of your vocal mix quality.
Due to the way the placement of studio monitors may affect how you hear the mix due to their specific frequency output, the ideal scenario is to find monitors that actually project the real true sound with all its flaws and detail. To allow you to accurately tweak and mix based on the sound you are hearing and the sound you would like to get to. The industry standard answer for this need is the Yamaha NS10s, which are widely used for mixing by most mix engineers and music producers.
Some mix engineers even have a small range of studio monitors to choose from for testing their vocal mix through different outputs to gauge where the mix is up to and any changes that still need to be made.
These are monitors that the engineers will be incredibly familiar with so that they can hear any clouding of the true sound based on the monitor’s output. Listening on specific studio headphones for mixing will also help you get clarity with flat frequency response for working.

Having said all this, sometimes the best IEMS or monitors to test your final vocal mix with are the cheapest speakers you can find. This is because the lower-end speakers have limited frequency response and replicate how the eventual listener will most likely be listening to your music. A neat trick is to turn down your mix all the way to really hear the vocal level and balance across your mix. We don’t recommend not to listen on bookshelf speakers, these often colour the sound too much for you to make accurate assessments.
How do you know when you are finished mixing vocals?
The answer to this question is always subjective; the vocal mix should be as good as it can possibly be for your song. However, try and gather any feedback you can on how the final product sounds from other people such as friends or family members who aren’t involved in music production before releasing anything online to get an idea of what direction you may want to go next time.
Always keep the main purpose of the vocals in mind when mixing
Vocals are there to communicate an idea or narrative to whoever is listening, so it is important to make sure that the produced sound can help provide convey that emotional quality to your song, making it more likely to be perceived as powerful and meaningful for listeners.
As you’re mixing your vocals, focus on how the important sounds of the lyrics are sitting in relation with each other. Even though it might be tempting to just bring up certain frequencies and make everything sound good individually, this can actually harm how they mix together into one cohesive track.
Vocals are also arguably the most important sound element in a song. If the vocals aren’t mixed correctly, this is generally the biggest giveaway that the mix is amateurish or poorly produced and the listener is likely to lose interest in your music.